
4
Using Zotero with Microsoft Word
In addition to using Zotero as an organizational tool, you can also use the program to generate in-text citations and bibliographic entries in a variety of word processors. In this section, we will focus on using Zotero with Microsoft Word.
To have the two programs work together, first, make sure that you have Zotero running in the background. Then, open Word. From the program toolbar, click the Zotero tab. (If you do not see the Zotero tab, please read through the section entitled “Locating the Zotero Tools in Microsoft Word” from chapter 1):

After clicking this tab, you will see the following options displayed in the Word ribbon:
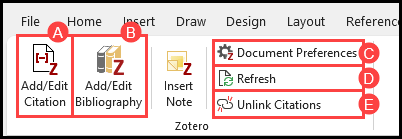
- Add/Edit Citation: This button allows you to insert or modify a citation at the current cursor position.
- Add/Edit Bibliography: This button allows you to insert or modify a bibliography at the current cursor position.
- Document Preferences: This button enables you to set your citation style (e.g., APA, MLA, Chicago).
- Refresh: This button refreshes the document; if you have edited the contents of a citation in Zotero, the “Refresh” button will ensure that the document reflects those changes.
- Unlink Citations: This button will sever the connection between Word and Zotero. This will convert your citations to plain text, preventing you from either automatically updating them with the “Refresh” button or converting them to a different style with the “Document Preferences” button.
Choosing a Citation Style
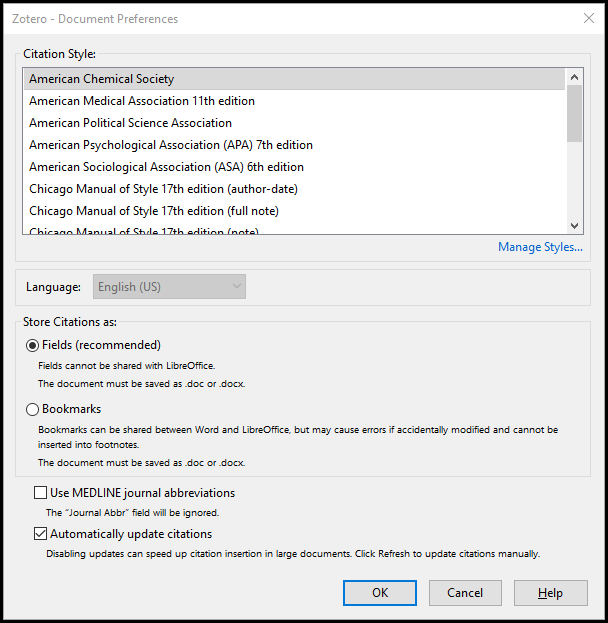
Before generating in-text citations and bibliographies, you will need to tell Word which citation style you want to work with. To do this, click Document Preferences, select the style you would like to use from the Citation Style list, and then click OK:
Zotero comes preloaded with the most commonly used citation styles (e.g., APA, MLA, Chicago), but what if the style you need is not on the list? Luckily, Zotero allows you to load additional styles manually. To do this:
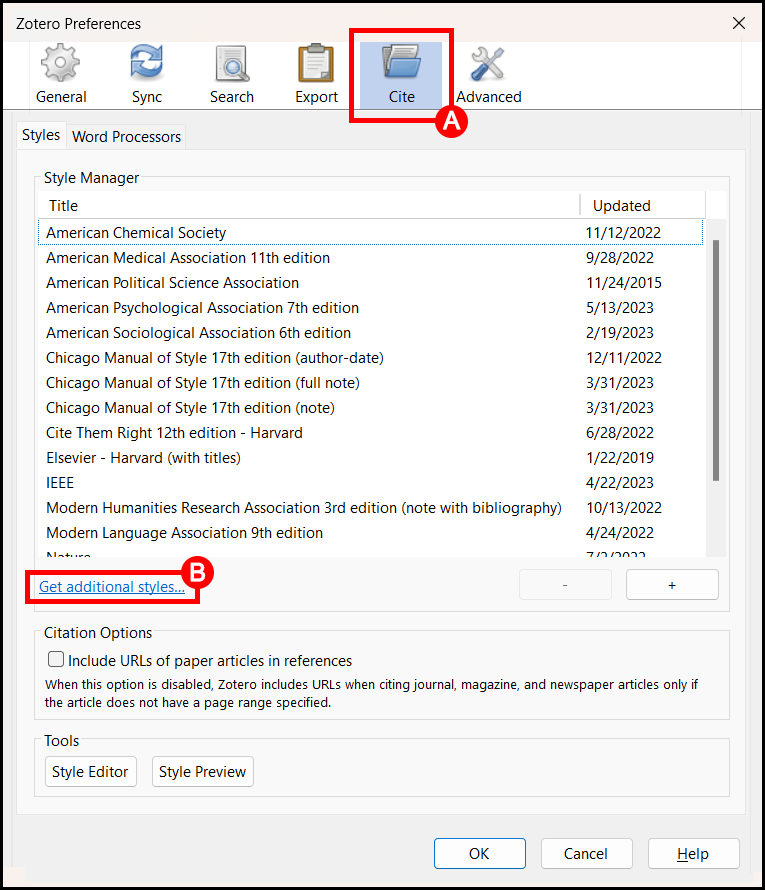
- Open Zotero and go to Edit → Preferences (PC) or Zotero → Preferences (Mac).
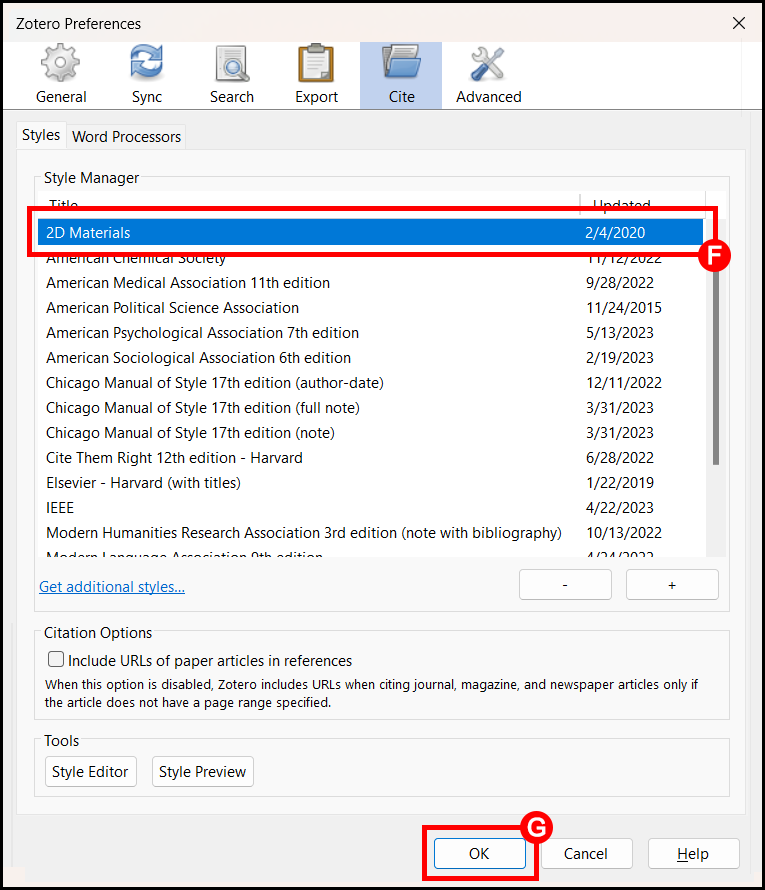
- From the Zotero Preferences window, select the Cite tab (A). From this tab, click the link below the “Style Manager” box that says Get Additional Styles (B).
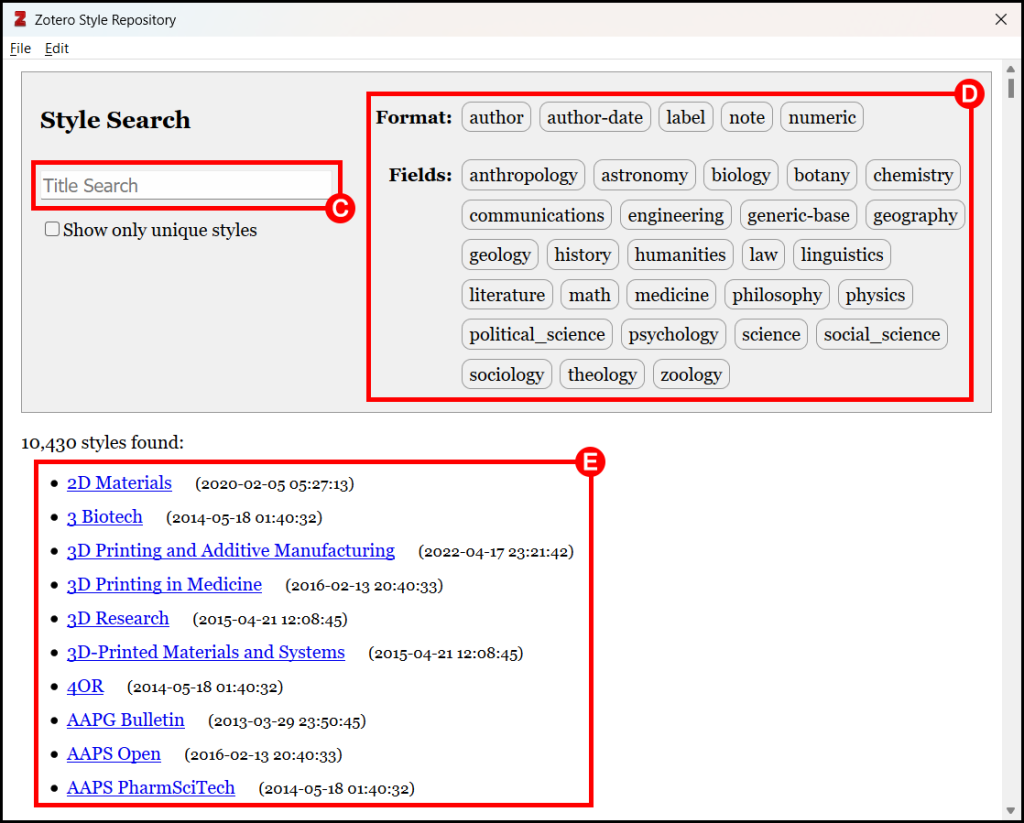
- This will open the Zotero Styles Repository, which lists over citation 10,000 styles that you can use. To find a style, search for it by name (C); you can also toggle the results by format style or by academic field (D).
- When you have found the style you want, click on it from the list provided (E) to add it to your Style Manager.
- Next, return to the Zotero Preferences window. The style you selected will now be included in the “Style Manager” list (F). Click OK (G).
- Finally, go to Word and click Document Preferences. From the Citation Style list, select the newly-added citation style and then click OK.
Generating In-Text Citations
Now that our citation style has been selected, we can use Zotero to generate in-text citations in our Word document. To do this, make sure that Zotero is running in the background, then:
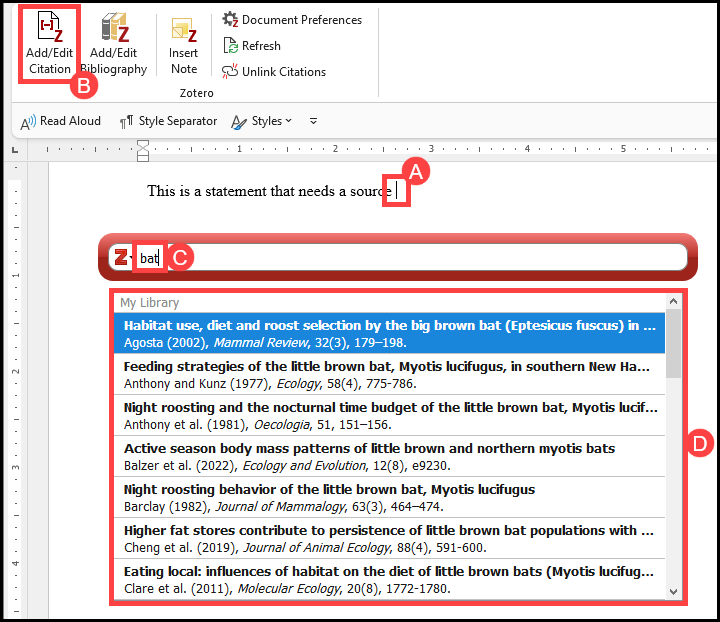
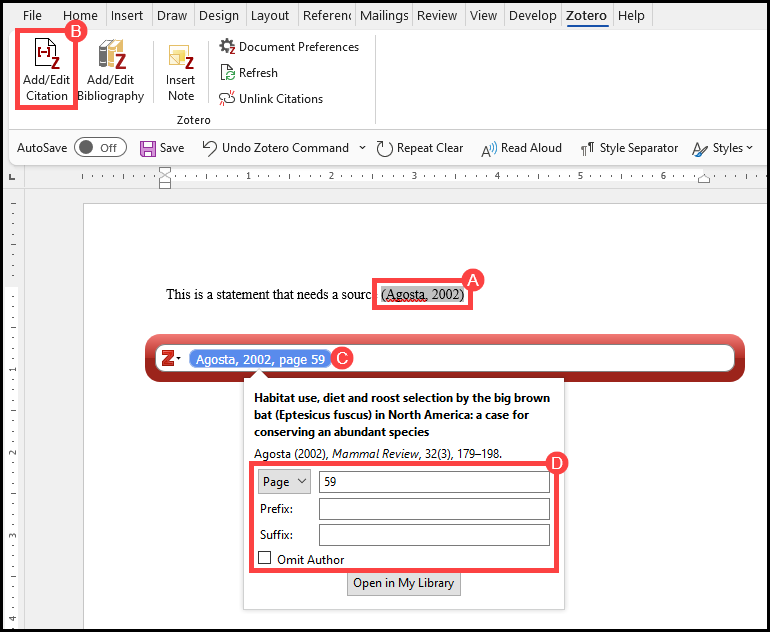
- Place the cursor at the location where you want the citation to appear (A). Note that Zotero will generate the citation at the location of the cursor, so it is important to ensure that the cursor is in the right place!
- From the Zotero toolbar, click the Add/Edit Citation button (B).
- A small red box will appear. In the slot provided, begin typing a title, an author name, or a year (C). Zotero will present you with a drop-down list of potential matches. If you see the citation you want, click on it (D):
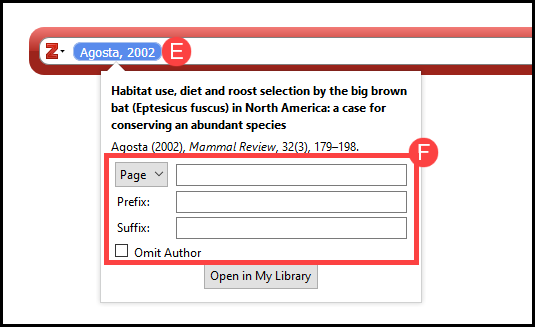
- The citation will now be listed in the red box. If you need to adjust how the citation appears (e.g., if you need to add a page number or suppress the author’s name), click on the citation (E) and use the Prefix, Suffix, Page and Suppress Author functions to tweak the citation to fit your needs (F).
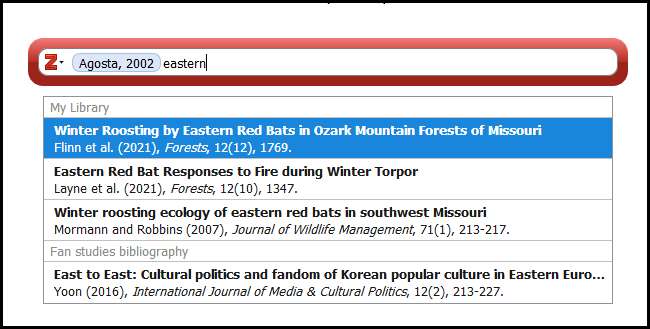
- To add another citation immediately after the first, simply type another keyword, name, date, etc. and select the appropriate citation from the drop-down list.
- When finished, hit the Enter key on your keyboard. The in‐text citation will appear automatically in your document. Zotero will also hold the citation in memory to include in your bibliography later.
Editing In-Text Citations
If you need to make changes to a citation that has already been inserted into your document:
- Click on that citation (A) and then choose the Add/Edit Citation (B) option from the Zotero toolbar.
- The red box will reappear, containing the citation in question. Click on the citation (C) and make any necessary changes in the box provided (D).
- Hit the Enter key. The in-text citation will then automatically be updated.
If you need to change the content of the citation itself (e.g., correcting a typo, adding/removing an author’s name, updating the year of publication), you will have to make this change in Zotero itself. To do this:
- Return to your Zotero library and locate the citation that needs to be updated.
- Adjust the citation’s metadata. Then, click away from the citation to save any changes.
- Return to Word, and from the Zotero toolbar, click the Refresh button. The update should be pushed through.
Inserting a Bibliography
When you are finished adding in-text citations to your document, the next steps is to generate a bibliography that lists all of the sources that you have used. To add a bibliography to your document:
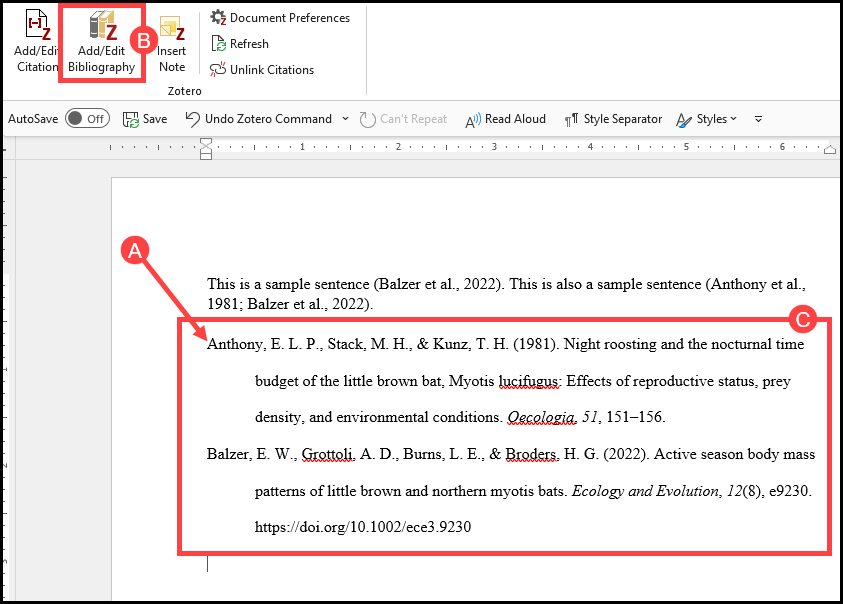
- Place your cursor at the location in the text where you would like your bibliography to be generated (A).
- Then, from the Zotero tab, click on the Add/Edit Bibliography button (B).
- Zotero will then generate a bibliography (C), listing all the citations that you have used in your document.
Note that this bibliography is dynamic, which means that whenever you remove a Zotero-generated in-text citation from your document, the bibliography will automatically update to reflect that removal; likewise, if you add new Zotero-generated in-text citations to your document, the bibliography will automatically update to reflect that addition.
If you need to change aspects of the bibliography itself (e.g., correcting a typo, adding/removing an author’s name, updating the year of publication), you will have to make this change in Zotero itself. To do this:
- Return to your Zotero library and locate the citation that needs to be updated.
- Adjust the citation’s metadata. Then, click away from the citation to save any changes.
- Return to Word, and from the Zotero toolbar, click the Refresh button. The bibliography should now reflect the changes you made.
Switching from One Citation Style to Another
Sometimes you might find yourself needing to convert all the citations in your document from one style to another. Luckily, Zotero can do this very easily: In the Word menu, go to the Zotero tab and choose the Document Preferences button. A window will appear listing various citation styles. From the list provided, select your desired citation style and then click OK. Zotero will automatically update the citations in your document to reflect your newly-chosen style.
Finishing Up
To create a final copy of your document, you will need to remove Zotero field codes—essentially, you will need to “unplug” Zotero from your Word file. Removing field codes will return your document to plain‐text, which means that you will be able to edit any citations as if they normal text. The downside is that you will lose Zotero’s ability to automatically update/format those citations. A good plan, then, is to save a copy of your document with the Zotero field codes in place first, that way if you need to go back and make major changes, you will still have a “plugged in” version. To remove field codes to create your plain text, final document:
- First, save your “plugged in” version as a backup.
- Next, go to the Zotero toolbar and click the Remove Codes icon.
- A warning box will appear. Click OK.
- Important: Immediately save the new version with a new name. This will ensure that you have two copies of the file: one with the Zotero formatting and one without.
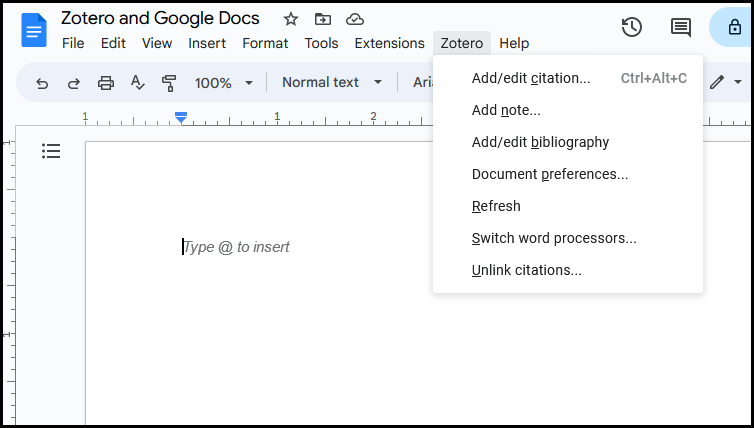
Using Zotero with Google Docs
If you don’t want to use Microsoft Word when writing up your research, you can also use Zotero with Google Docs. When you install the Zotero Connector, a Zotero tab will automatically be added to your Google Docs menu, and while the interface is a bit different from Word, the Zotero tools work the exact same way.
Note that when you are working with the Zotero feature for the first time in Google Docs, you will be asked to authenticate the plugin using your Google account. This authentication step is not related to any Zotero account you might have (see next chapter for more), and a Zotero account is not required to use the program with Google Docs.
