
Presenting Your Ideas
Learning Objectives
- Recognize the role of a specific purpose in crafting an informative speech
- Explain the process of grouping information
- Review and apply major organizational patterns
- Describe outlining best practices
- Identify strategies for effective introduction and conclusions
- Understand the key principles guiding presentation aid creation and utilization
- Describe core speech delivery element
Selecting and constructing an argument that advocates can be tough. First we select a general purpose for the argument. Are you seeking to inform, persuade or entertain the audience? The most basic general purpose, and one we’ll use in this course is to inform. Next, we formulate an overarching thesis, “I want to inform the class about…” For example, “I want to inform the class how physicians use nonverbal communication to convey uncertainty” or “I want to inform the class how couples breaking up in the workplace affects their coworkers.” The process, however, doesn’t stop there. A well-reasoned, researched, and constructed argument is key to effectively crafting and conveying information. The next step is determining how to organize and outline that information so that the audience can follow along. This chapter overviews how to craft a specific purpose for a speech, how to group an organize information, and how to create a cohesive speech including crafting introductions and conclusions.
Start with a Specific Purpose
A specific purpose statement builds on your general purpose (such as to inform) and makes it more specific (as the name suggests). So, if you’re giving a persuasive speech, your general purpose will be to persuade your audience about, for example, the rising cost of textbooks. Written together, your specific purpose would read, “to persuade my audience to support campus solutions to rising textbook costs.”
Your general purpose and audience will influence how to write your specific purpose statement (see Table 1).
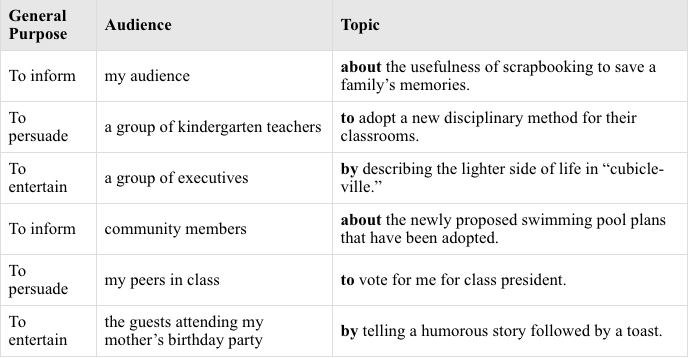
Table 1 (Stand Up, Speak Out).
Table 1 demonstrates how to move from the general purpose to the specific purpose while keeping your audience in mind. So far, so good, right? Before moving forward with writing the thesis, main points, etc. be aware these common pitfalls for writing specific purpose statements.
Being Too Broad
Specific purpose statements sometimes try to cover far too much and are too broad. You are funneling a broad topic to a specific argument, so don’t stop at the topic. Instead, ask, “am I trying to do too much?”
Consider this specific purpose statement: To explain to my classmates the history of ballet.
This subject could result in a three-hour lecture, maybe even a whole course. You will probably find that your first attempt at a specific purpose statement will need refining.
These examples are much more specific and much more manageable given the limited amount of time you will have:
To explain to my classmates how ballet came to be performed and studied in the U.S.
To explain to my classmates the difference between Russian and French ballet.
To explain to my classmates how ballet originated as an art form in the Renaissance.
To explain to my classmates the origin of the ballet dancers’ clothing.
Often, broadness is signaled by the use of “and,” where a specific statement is making two arguments.
These examples cover two different topics:
To explain to my audience how to swing a golf club and choose the best golf shoes.
To persuade my classmates to be involved in the Special Olympics and vote to fund better classes for the intellectually disabled.
Too Specialized
The second problem with specific purpose statements is the opposite of being too broad, in that some specific purposes statements are so focused that they might only be appropriate for people who are already extremely interested in the topic or experts in a field. For example:
To inform my classmates of the life cycle of a new species of lima bean (botanists, agriculturalists).
To inform my classmates about the Yellow 5 ingredient in Mountain Dew (chemists, nutritionists).
To persuade my classmates that JIF Peanut Butter is better than Peter Pan. (organizational chefs in large institutions).
Group Ideas (Create Main Points)
Organizing information and reflecting on the best way to communicate an idea isn’t unique to a public speech; we do it all the time in private. Consider the following scenario:
Two friends – Anne and Stevie – have been dealing with interpersonal conflict. They can’t get along. Stevie decides that it’s time to sit down and tell Anne how she’s feeling, but first, she jots some notes. “Where to start?” she thinks, and tries to consider how she wants to breach the topic. “From the first time I was upset?” “Should I talk generally about the main 2 issues that keep bothering me?” “How do I start?”
Stevie is trying to process how to organize the information that she’ll present to Anne – the main audience member. She’s also processing the best way to start – or to introduce – that information to her friend, and outlining key ideas that she wants to remember.
The same is true for preparing arguments in a speech. Having your information in a organized effectively can make or break audience understanding of your content. This chapter discusses ways to effectively categorize your information that will (a) support your thesis statement, and (b) increase audience comprehension of that information. To accomplish these tasks, we will introduce different organizational patterns, tips for outlining, and strategies for crafting your introduction and conclusion. Before you can select an organizational pattern, you should first work to group your information.
Have you ever organized a garage sale? The first step, before putting up signs or pricing items, is to go through your closets and garage and create “piles” of items that you want to sell: children’s items, tools, kitchen items, furniture, trash, etc. Researchers have found that “chunking” information, that is, the way it is grouped, is vital to audience understanding, learning, and retention of information. 1,2,3
As we listen, we have limits as to how many categories of information we can keep in mind. In public speaking, use approximately three (3) categories to group your information. 2-3 main points – or groups – is safe territory, and you should avoiding having more than 5 main points for an audience, as they will be far less likely to follow your argument.
“How does this work in practice?” you may be asking. “How do I group information to find my categories?”
Use your research and your brainstorming tactics! As you research, look at the articles and websites you read and say, “That information relates to what I read over here” and, “That statistic fits under the idea of . . .” You are looking for similarities and patterns. Think back to the yard sale example – you would group according to customer interest and the purpose of each item. As you learn more about your topic and expand your expertise, the patterns and groups will become clearer.
Once you locate a pattern, that information can likely be grouped into your speech’s main points. Return to your thesis statement and determine what groups are more suitable to support your specific purpose. If you continue to find more groups, you may want to limit and narrow your topic down further.
Finally, because your audience will understand you better and perceive you as organized, you will gain more credibility as a speaker if you are organized, assuming you also have credible information and acceptable delivery. 4,5
Research Insight: Grouping Content Helps Your Writing!
Yun and colleagues (2012) found a side benefit to learning to be an organized public speaker: your writing skills will improve, specifically your organization and sentence structure. Working on your organization will increase your critical thinking skills all around.
After you group, the next step is determining what type of organizational pattern works best.
Patterns of Organization
At this point, you should see how much your audience needs organized ideas. You also know that as you do research, you will group together similar pieces of information from different sources. As you group your research information, you will want to make sure that your grouped content is adhering to your specific purpose statement.
Interestingly, there are some standard ways of organizing these categories, which are called patterns of organization. This list isn’t exhaustive, this chapter briefly reviews five (5) organizational patterns with a few embedded examples. In each example, only the three to five main sections or “points” (Roman numerals) are given, without the other essential parts of the outline. But don’t worry—we’ll cover outlines later in this chapter.
Chronological
A chronological organizational pattern groups information based on time order or in a set chronology—first this occurred, then this, then this, then that. The use of a chronological pattern is appropriate when the argument needs to be traced linearly or for speeches that instructor or demonstrate. For a speech about creating a meaningful and memorable protest poster, providing the instructions in order will allow audience members to actively deploy that information after the speech.
One of the problems with chronological speeches is the tendency to create a long list of activities rather than categorizing the content. It is important to chunk the information into three to five groups so that the audience has a framework. For example, in a speech about the history of the Civil Rights Movement, your “grouping” or “chunking” might be:
I. The movement saw African-Americans struggling for legal recognition before the Brown v. Board of Education decision.
II. The movement was galvanized and motivated by the Montgomery Bus Boycott.
III. The movement saw its goals met in the Civil Rights Act of 1965.
It would be easy in the case of the Civil Rights Movement to list the many events that happened over decades, but that could be overwhelming for the audience. In this grouping of events, the audience is focused on the three events that pushed it forward.
Spatial
You can see that chronological is a highly-used organizational structure, since one of the ways our minds work is through time-orientation—past, present, future. Another common thought process is movement in space or direction, which is called the spatial pattern. For example:
Specific Purpose: To explain to my classmates the three regional cooking styles of Italy.
I. In the mountainous region of the North, the food emphasizes cheese and meat.
II. In the middle region of Tuscany, the cuisine emphasizes grains and olives.
III. In the southern region and Sicily, the diet is based on fish and sea-food.
In this example, the content is moving from northern to southern Italy, as the word “regional” would indicate. If you were to actually study Italian cooking in depth, sources will say there are twenty regions, but “covering” twenty regions in a speech is not practical, so research can help you limit and determine which regions would be more appropriate.
For a more localized application, consider this example:
Specific Purpose: To explain to my classmates the geographic layout of the Midwest Science March.
I. The main vein of the protest took place on the Kansas City Plaza.
II. Vendor booths promoting educational opportunities about science were grouped at Washington Square.
III. Counter-protesting was predominantly south of the river.
A spatial organizational pattern can assist audiences in visualizing your main points by grouping based on a spatial or geographic layout.
Topical/Categorical
The topical organizational pattern groups information into key categories. Many subjects will have main points that naturally divide into “types of,” “kinds of,” “sorts of,” or “categories of.” Other subjects naturally divide into “parts of the whole.” For example:
Specific purpose: To support the proposition that capital punishment should be abolished in the United States.
I. Capital punishment does not save money for the justice system.
II. Capital punishment does not deter crime in the United States historically.
III. Capital punishment has resulted in many unjust executions.
Another principle of organization to think about when using topical organization is “climax” organization. That means putting your strongest argument or most important point last when applicable. In the example above, “unjust executions” is a bigger reason to end a practice than the cost, since an unjust execution means the loss of an innocent life and a violation of our principles. If you believe Main Point III is the strongest argument of the three, putting it last builds up to a climax.
When using a topical pattern, you want to keep your categories simple, clear, and distinct by reducing repetition or blurriness between the groupings.
Cause/Effect Pattern
In a cause/effect pattern, the main points of a topic start with the cause(s), followed by the effect(s). If the specific purpose mentions words such as “causes,” “origins,” “roots of,” “foundations,” “basis,” “grounds,” or “source,” it is a causal order; if it mentions words such as “effects,” “results,” “outcomes,” “consequences,” or “products,” it is an effect order. If it mentions both, it would be cause/effect order. This example shows a cause/effect pattern:
Specific Purpose: To explain to my classmates the causes and effects of schizophrenia.
I. Schizophrenia has genetic, social, and environmental causes.
II. Schizophrenia has educational, relational, and medical effects.
This pattern can be helpful for an audience to understand how and/or why something has occurred. If your topic looks at a key problem, tracing how that problem originated may be worthwhile, even necessary, for an audience to track the outcomes.
Problem-Solution Pattern
The problem-solution pattern is closely related to cause/effect, but it also includes advocating for a key solution. This is a common organizational strategy used to persuade because a speaker is often asking the audience to address a problem with a concrete course of action. When you want to persuade someone to act, the first reason is usually that something is wrong!
We use a problem-solution pattern in everyday exchanges. If you and your friends were hungry (a problem), you’d invite them to dinner (the solution). However, if they’d recently eaten you might identify a secondary problem—you miss their company, for example.
Alternatively, let’s say that you want school board members to provide more funds for music at the three local high schools in your county. Ask yourself: What is missing because music or the arts are not funded? What is the problem? How is that a problem something that the school board should intervene to resolve? How does funding those programs resolve the problems that you’ve identified? For example:
Specific Purpose: To persuade the members of the school board to take action to support the music program at the school.
I. There is a problem with eliminating extracurricular music programs in high schools.
a. Students who do not have extracurricular music in their lives have lower SAT scores.
b. Schools that do not have extracurricular music programs have more instances of community violence.
II. The solution is to provide $200,000 in the budget to sustain extra-curricular music in our high schools.
a. $120,000 would go to bands. This would be enough money to hire additional instructors and reserve after-school spaces.
b. $80,000 would go to choral programs.
Of course, this is a simple outline and you would need to provide evidence to support the arguments, but it shows how problem-solution works. Psychologically, it makes more sense to use problem-solution rather than solution-problem. The audience will be more motivated to listen if you address needs, deficiencies, or problems in their lives rather than giving them solutions first.
Outlining
After identifying an organizational pattern, an outline will assist you to compile information into that pattern. An outline provides a visual structure where you can compile information into a well-organized document. There are two primary types of outlines that we will discuss: preparation outlines and speaking outlines.
Preparation Outlines
Preparation outlines are comprehensive outlines that include all of the information in your speech. These are often full-sentences and include in-text citations and a reference page (if necessary). If someone were to read your outline, there should be enough depth to provide a skeleton of what will be accomplished.
Generally, we recommend starting from the outline format shown in Table 1, which is also presented as a template in the workbook:
|
Table 1 Sample Outline Template |
|
I. Introduction a. Attention Getter |
II. Main body
|
| III. Conclusion
a. Review of Main Points
Note: Connective transitions will be necessary to move between each main point and each major section. |
This is just a start, and each main point may have more than one piece of evidence, for example.
An outline is a visual structure, and it can aid you in determining where you need more or less information. For example, if you work on a problem/solution speech, your outline may visually demonstrate that most of your research is located under the “problem” main point, signaling to you that more “solution” research is required. Outlines also assist in reminding speakers to warrant all of their claims.
You should think of the outline as the blueprint for your speech. It is not the speech—that is what comes out of your mouth in front of the audience. The outline helps you prepare and, as such, they are a living document that you can adjust, add, and delete. We recommend beginning to add information to an outline right away. You don’t, however, often speak from that outline. Instead, you’ll use a speaking outline.
|
Table 2 Tips for Effective Outlining |
|
Speaking Outlines
A speaking outline is a keyword outline used to deliver a speech – often extemporaneous. Delivering an aesthetic experience, the notes that you use to speak can aid or hinder in an effective delivery. A speaking or keyword outline – which you’ll use to rehearse and deliver – will allow greater embodiment and engagement with the audience. As you practice, you will be able to summarize the full preparation outline down to more usable notes. In those notes, create a set of abbreviated notes for the actual delivery. The more materials you take up with you to speak, the more you will be tempted to look at them rather than have eye contact with the audience, reducing your overall engagement.
Your speaking notes should be in far fewer words than the preparation, arranged in key phrases, and readable for you. Your speaking outline should provide cues to yourself to “slow down,” “pause,” or “change slide.” The biggest suggestion is to make the notes workable for you. Many people use multiple colors for main points, sub points, and evidence to help make the speaking outline easy to follow visually.
Finally, always double check that your speaking outline includes your oral citations. An authors name and publication date are difficult to remember, so add all references directly into your notes.
Connective Statements and Internal Organization
At this point, you may be realizing that preparing for public speaking does not always follow a completely linear process. In writing your speech, you might begin outlining with one organizational pattern in mind, only to re-craft the main points into a new pattern after more research has been conducted. This is normal, but wherever your process takes you, you will need to make sure that each section of your speech outline is connected – what we call connective statements. Connective statements are statements generally designed to help “connect” parts of your speech to make it easier for audience members to follow. Connectives are vital tools for helping the audience listen, retain information, and follow your structure.
Connectives perform a number of functions:
- Remind the audience of what has come before;
- Remind the audience of the central focus or purpose of the speech;
- Forecast what is coming next;
- Help the audience have a sense of context in the speech—where are we? (this is especially useful in a longer speech of twenty minutes or so);
- Explain the logical connection between the previous main idea(s) and next one, or previous subpoints and the next one;
- Explain your own mental processes in arranging the material as you have;
- Keep the audience’s attention through repetition and a sense of movement.
Connectives can include internal summaries, signposting or internal previews. Each of these terms all help connect the main ideas of your speech for the audience, but they have different emphases and are useful for different types of speeches. Connectives are particularly important in a speech because the audience does not have a page to look at; instead, listeners are relying on you to tell us what you have covered, what you are covering, and what you will be covering in the presentation.
Types of connectives and examples
Internal summaries emphasize what has come before and remind the audience of what has been covered.
“So far I have shown how the designers of King Tut’s burial tomb used the antechamber to scare away intruders and the second chamber to prepare royal visitors for the experience of seeing the sarcophagus.”
Internal previews let your audience know what is coming up next in the speech and what to expect with regard to the content of your speech.
“In this next part of the presentation I will share with you what the truly secret and valuable part of the King Tut’s pyramid: his burial chamber and the treasury.”
Transitions serve as bridges between seemingly disconnected (but related) material, most commonly between your main points. At a bare minimum your transition is saying, “Now that we have looked at (talked about, etc.) X, let’s look at Y.”
Signposts emphasize the physical movement through the speech content and let the audience know exactly where they are. Signposting can be as simple as “First,” “Next,” “Lastly” or using numbers such as “First,” “Second,” Third,” and “Fourth.” Signposts can also be lengthier, but in general signposting is meant to be a brief way to let your audience know where they are in the speech. It may help to think of these like the mile markers you see along interstates that tell you where you are or like signs letting you know how many more miles until you reach your destination.
Connectives are an important way to assist the audience in understanding (a) where you’ve been, (b) where you are, and (c) where you’re going. We recommend labeling them directly in your outline to make sure that they’re integrated and clear.
Introductions and Conclusions
Now that you have a deeper understanding of organizational patterns and placing your information into an outline, let’s discuss introductions and conclusions. We recommend writing these sections after you have a substantial amount of the main body constructed in your outline.
Introductions and conclusions serve to frame the speech and give it a clearly defined beginning and end. They help the audience to see what is to come in the speech, and then let them mentally prepare for the end. In doing this, introductions and conclusions provide a “preview/review” of your speech as a means to reiterate to your audience what you are talking about. Because speeches are auditory and live, you need to make sure that audiences remember what you are saying.
The general rule is that the introduction and conclusion should each be about 10% of your total speech, leaving 80% for the body section. It can be tempting to have longer introductions, but that often leaves less time to introduce key research and warrant your ideas through the main points. Even though they are only 10% of your total speech, these sections are probably the most important because they clearly preview and review the structure of your argument an help the audience by providing a frame what you are sharing. Table 3 shows the most common mistakes people make when creating an introduction.
|
Table 3
Common Errors to Avoid in Introductions
|
|
Structuring the Introduction
With that in mind, there are five basic elements that you will want to incorporate into your introduction and speech outline.
Element 1: Get the Audience’s Attention
The first major purpose of an introduction is to gain your audience’s attention and make them interested in what you have to say. The first words of a speech should be something that will perk up the audience’s ears. Starting a speech with “Hey everybody. I’m going to talk to you today about soccer” has not tried to engage the individuals in the audience who don’t care about soccer.
To create interest, the key is selecting an option that’s appropriate and relevant to your specific audience. You will also want to choose an attention-getting device appropriate for your speech topic. Ideally, your attention-getting device should have a relevant connection to your speech. Below are a number of possibilities for crafting an attention getter.
Anecdotes and Narratives
An anecdote is a brief account or story of an interesting or humorous event. Notice the emphasis here is on the word “brief.” An example of an anecdote used in a speech about the pervasiveness of technology might look something like this:
In July 2009, a high school girl named Miranda Becker was walking along a main boulevard near her home on Staten Island, New York, typing in a message on her cell phone. Not paying attention to the world around her, she took a step and fell right into an open construction hole.
Notice that the anecdote is short and has a clear point. From here the speaker can begin to make their point about how technology is controlling our lives.
A personal story is another option here. You may consider starting your speech with a story about yourself that is relevant to your topic. Some of the best speeches are ones that come from personal knowledge and experience. If you are an expert or have firsthand experience related to your topic, sharing this information with the audience is a great way to show that you are credible during your attention getter.
Startling Statement/Statistic/Fact
Another way to start your speech is to surprise your audience with startling information about your topic. Often, startling statements come in the form of statistics and strange facts. The goal of a good startling statistic is that it surprises the audience and gets them engaged in your topic. For example, if you’re giving a speech about oil conservation, you could start by saying, “A Boeing 747 airliner holds 57,285 gallons of fuel.” You could start a speech on the psychology of dreams by noting, “The average person has over 1,460 dreams a year.”
A strange fact, on the other hand, is a statement that does not involve numbers but is equally surprising to most audiences. For example, you could start a speech on the gambling industry by saying, “There are no clocks in any Las Vegas casino.”
Although startling statements are fun, it is important to use them ethically. First, make sure that your startling statement is factual. Second, make sure that your startling statement is relevant to your speech and not just thrown in for shock value.
A Rhetorical Question
A rhetorical question is a question to which no actual reply is expected. For example, a speaker talking about the history of Mother’s Day could start by asking the audience, “Do you remember the last time you told your mom you loved her?” In this case, the speaker does not expect the audience to shout out an answer, but rather to think about the questions as the speech goes on.
Quotation
Another way to capture your listeners’ attention is to use the words of another person that relate directly to your topic. Maybe you’ve found a really great quotation in one of the articles or books you read while researching your speech. If not, you can also use a number of Internet or library sources that compile useful quotations from noted individuals. Quotations are a great way to start a speech, so let’s look at an example that could be used during the opening of a commencement address:
The late actress, fashion icon, and social activist Audrey Hepburn once noted that, “Nothing is impossible. The word itself says ‘I’m possible’!”
Element 2: Establish or Enhance Your Credibility
Whether you are informing, persuading, or entertaining an audience, they will expect you to know what you’re talking about. The second element of an introduction is to let your audience know that you are a knowledgeable and credible source for this information. To do this, you will need to explain how you know what you know about your topic.
For some people, this will be simple. If you are informing your audience about a topic that you’ve researched or experienced for years, that makes you a fairly credible source. You probably know what you are talking about. Let the audience know! For example, “I’ve been serving with Big Brothers Big Sisters for the last two years.”
However, you may be speaking on a subject with which you have no history of credibility. If you are just curious about when streetlights were installed at intersections and why they are red, yellow, and green, you can do that. But you will still need to give your audience some sort of reason to trust your knowledge. Since you were required to do research, you are at least more knowledgeable on the subject that anyone else in the class. So you might say something like “I’m not a traffic engineer, but after extensive research I’ve learned a lot about traffic control devices, the technical term for stop lights.”
Element 3: Establish Relevance through Rapport
The next element of your introduction will be to establish rapport with your audience. Rapport is basically a relationship or connection you make with your audience. In everyday life, we say that two people have a rapport when they get along really well and are good friends. In your introduction, you will want to explain to your audience why you are giving them this information and why it is important or relevant to them. You will be making a connection through this shared information and explaining to them how it will benefit them. For instance, “Since 69% of us in this room will be parents someday, and all of us have parents or guardians, parent-child communication is relevant to each of us.”
Element 4: State your Thesis
The fourth major function of an introduction after getting the audience’s attention is to reveal the purpose of your speech to your audience. Have you ever sat through a speech wondering what the basic point was? Have you ever come away after a speech and had no idea what the speaker was talking about? An introduction should make the topic, purpose, and central idea clear. The thesis is simply a succinct, single-sentence, description of the main idea for the presentation. Thesis are often based on and very similar to the specific purpose for the presentation.
When stating your topic in the introduction, be explicit with regard to exactly what your topic is. Spell it out for them if you have to. If an audience is unable to remember all your information, they should at least be able to walk away knowing that the purpose of your presentation was.
Element 5: Preview Your Main Points
Just like previewing your topic, explicitly previewing your main points helps your audience know what to expect throughout the course of your speech and prepares them for what you are going to speak on. Your preview of main points should be clear and easy to follow so that there is no question in your audience’s minds what they are. Long, complicated, or verbose main points can get confusing. Be succinct and simple, we include numerals to show the main points in this example: “Today, in our discussion of Abraham Lincoln’s life, (i) we will look at his birth, (ii) his role a president, and (iii) his assassination.” From that there is little question as to what specific aspects of Lincoln’s life the speech will cover. However, if you want to be extra sure they get it, you can always enumerate them by using signposts: “In discussing how to make chocolate chip cookies, first we will cover what ingredients you need, second we will talk about how to mix them, and third we will look at baking them.”
These five elements prepare your audience for the bulk of the speech (i.e. the body section) by letting them know what they can expect, why they should listen, and why they can trust you as a speaker. Having all five elements starts your speech off on much more solid ground that you would get without having them.
Check out Sheryl Sandberg’s speech, “Why we have few too women leaders,” and listen to the first few messages. Can you identify and label the parts of her introduction? How did it help you in understanding her message? Was it clear? Did it grab your attention?
Structuring the Conclusion
Similar to the introduction, the conclusion has three specific elements that you will want to incorporate in order to make it as strong as possible. Given the nature of these elements and what they do, these should generally be incorporated into your conclusion in the order they are presented below. Table 4 shows some common errors tied to conclusions.
|
Table 4
Common Errors to Avoid in Conclusions
|
|
Element 1: Review the Main Points
Introductions preview your main points; the conclusion provides a review. One of the biggest differences between written and oral communication is the necessity of repetition in oral communication. Your audience only has one opportunity to catch and remember the points you are trying to get across in your speech, so the review assists in repeating key ideas that support your thesis statement.
Because you are trying to remind the audience of your main points, you want restate the main points using the same language used to introduce and present them. Be sure not to bring up any new material or ideas. For example, if you said, “There are several other issues related to this topic, such as…but I don’t have time for them,” that would make the audience confused and perhaps wonder why you did not address those in the body section. The hardcore facts and content are in the body.
Element 2: Restate the Thesis
Make sure to re-state your thesis because this is the main argument that you’re leaving the audience with. While this may come before or after the review of your main points, it’s important because it often directs the audience and reminds them why they’re present. Concluding without reiterating your thesis statement requires the audience to remember an idea from the introduction – which can feel like a long time ago.
Element 3: Clincher – Close with Impact
The third element of your conclusion is the clincher, or something memorable with which to conclude your speech. The clincher is sometimes referred to as a concluding thought. These are the very last words you will say in your speech, so you need to make them count.
In many ways the clincher is the inverse of the attention-getter. You want to start the speech off with something strong, and you want to end the speech with something strong. To that end, similar to what we discussed above with attention getters, there are a number of ways you can make your clincher strong and memorable. Table 5 presents some strategies for a strong clincher.
| Table 5
Strategies for Effective Concluding Thoughts |
|
| Conclude with a Challenge | A challenge is a call to engage in some kind of activity that requires |
| Conclude with a Quotation | Select a quotation that’s related to your topic |
| Visualize the Future | Help your audience imagine the future you believe can occur. |
| Conclude by Inspiration | Use inspiration to stir someone’s emotions in a specific manner. |
| Conclude with a Question | Ask a rhetorical question that forces the audience to ponder an idea. |
| Refer to the Introduction | Come full circle by referencing an idea, statistic, or insight from the attention getter |
| Conclude with a Story | Select a brief story aimed at a strong emotional appeal |
For the conclusion, make sure your purpose – informative, persuasive, entertaining – is acknowledged.
Making Information Easy to Remember: Presentation Aids
In many, if not all of the classes you have taken, your instructors have used presentation aids. Projectors, PowerPoint, models, and even the whiteboard are all examples of visual aids. In addition, demonstrations of how to do things, like how to glove and gown in a surgical tech class, are examples of using visual aids. In a Music Technology course, the instructor will use recorded examples so students can better hear the concepts at work. This is also an example of a presentation aid. Similarly, in your speeches, you will use presentation aids to help your intended audience better understand and remember information.
Definition and Purpose
Presentation aids are a form of supporting materials, and they are simply visual and/or auditory examples and tools used to help your intended audience better understand and remember the key ideas in your speech.
Presenters use visual aids to get and hold the audience’s attention, help clarify ideas and concepts, provide examples and reinforce ideas, and contribute to the credibility of the speaker. There are lots of connections between presentation aids and nonverbal messages, such as gestures, which is covered in the final section of this chapter.
Creating your Presentation Aids
When it comes to creating your presentation aids, the key points emphasized in this chapter still hold true: strive for clarity, and keep the intended audience in mind. With all of the technology tools we have available, it can be tempting to try to create something fancy or visually exciting, but remember that you don’t want your presentation aids to distract from your speech. You want them to enhance your speech, and often simple is better. In addition, be sure to only use the presentation aids you need; don’t include presentation aids just because they are available. As always, the key is clarity.
Most students use a PowerPoint for their visual aid, because they are easy to create, and they are easy for the audience to see, regardless of where they are sitting in the classroom. Consider a speech covering how to make a nutritious smoothie. While the person presenting this speech could bring in the ingredients and the tools to use as presentation aids, it would be hard for anyone sitting towards the back of the room to actually see what is going on. In addition, the presenter would have to bring a lot of things with them, and it would require time to set up for the speech. A better approach would be to take pictures of the tools, ingredients, and process and put those pictures in a PowerPoint. Those pictures could also be combined with text to help the audience understand. Not only would this approach better allow the audience to see, it would free up the presenter to focus on delivering the speech, rather than trying to create the smoothie in front of the audience.
When creating a PowerPoint (or any other readily available presentation format), you can use one of the readily available templates. All of the set up work has been done in these templates, which will make it easier for you to focus on creating the presentation aid, rather than designing it. Other things to keep in mind are to be consistent in your font choice, although you may alternate between font sizes for header text versus body text. Speaking of text, you don’t want to overwhelm your audience with excessive amounts of text. Do NOT simply read the slides to the audience. Further, there shouldn’t be so much text the audience is reading the slide while you are speaking; the text on the slides should simply serve as category holders. In addition, it is very helpful to animate the text on the slides so it only appears as you need it. That way the audience isn’t reading ahead to point number four (4) while you’re still talking about point number one (1).
Another helpful thing to do with PowerPoint is to insert a blank slide when you are talking but not referencing something on the screen. That way the audience isn’t looking at what’s coming next or what you just talked about while you’re introducing a new idea. Inserting a blank slide is simple, and doing so adds a nice professional polish to your speech. Overall, speakers ought to follow the 6 X 6 rule. The 6 X 6 rule is a guide for text on visual aids. Generally present no more than six bullet points with no more than six words per bullet point on a slide. Only break this rule if you have a compelling reason.
A note on using video: the guideline for using video is that it can be no longer than 30 seconds of the speech. Still, using video can make it much more complicated to deliver the speech instead of simplifying. You will need to ensure that the visual and audio components of the video are accessible to the audience before your presentation. Consider what you will do while the video is playing: will you simply stand there and watch it with the audience? Will you be pausing it to point things out? Will you need to rewind it to point things out? While it certainly isn’t incorrect to use a video, keep in mind that you need to be delivering the speech, not the video. As such, you need to carefully consider whether you want to invest some of the time you have in showing a video and whether it is going to be helpful to your audience in terms of understanding. Again, it is not incorrect to use video, but using video well is more complicated than it might first appear.
Rehearsal with Presentation Aids
When it comes to using your presentation aids, rehearsal with the presentation aid is key. You don’t want it to seem like you are looking at your PowerPoint for the first time when you open it in front of the class. Know how to make your PowerPoint full screen, advance the slides, etc. In addition, you need to make sure you can access your presentation aid if you don’t have it on a thumb drive. Be sure you can open it on a campus computer, or the technology that you’re using to display it will interface with the classroom computer, before the day of the speech. Also keep in mind that if you are using something like Google drive, you may be prompted to receive a code and enter it before you can access your materials on the classroom computer.
The important thing is to make sure that your presentation aids are available, as you obviously don’t want to have to deliver your speech without them, and it can be nerve-racking to have the class sit and watch while you try to figure out the technology. It is essential that you are prepared both to access and use your presentation aids.
A few more things regarding presentation aids: your presentation aids are not your delivery outline! Your presentation aids shouldn’t be something you are turning around and talking to (unless that is appropriate for where you are in your speech). Your focus is on talking to your audience, not your presentation aid. Similar to what was emphasized before regarding delivery, you want to rehearse delivering the speech (as opposed to memorizing it), and the rehearsal of delivering the speech includes rehearsing with your presentation aids.
Delivering your Speech
Finally, we will cover some key topis and strategies for delivering your speech.
Paralanguage
When presenting it’s important to strategically use of paralanguage. Paralanguage is the vocal but nonverbal dimension of speech. It involves things like inflection, stresses, volume, rate, pauses, rhythm, and creating variety.
The simplest and most direct thing to remember is that variety is important. What this means is that you want to avoid the delivery of your speech sounding repetitive. Probably the most common thing is falling into a repetitive rhythmic pattern. This occurs when the speech starts to sound something like this: blah blah blah blah blah blah blah blah blah pause blah blah blah blah blah blah blah blah blah pause, etc.
When the speech delivery sounds like this, it seems like the person is reading until they run out of breath, taking a breath, and then reading some more. It creates a steady rhythm that can distract the listener from the words and message, and it also can make the message hard to hear because it tends to lead to breaks in the middle of sentences in places where you normally wouldn’t have breaks. This often comes from trying to memorize the speech, rather than practicing delivering the speech. When it comes to paralanguage, the important thing is to remember that you want your delivery to feel conversational. When you have a conversation, you will naturally fall into inflection patterns, stresses, pauses, etc. That will provide the variety that you need to keep your paralanguage interesting, and it really points to the importance of practicing delivering the speech rather than trying to memorize the speech.
One other important thing regarding paralanguage is to articulate clearly and effectively. This involves not speaking too fast or too slow, and it also means we need to pay attention to enunciating clearly. In casual conversation, we sometimes tend to blend words together; for example, “do you know what I am saying?” tends to sound more like “gnome saying?,” and “what time is it?” sounds more like “what timezit?” Those expressions can be fine in casual conversation, but in a speech, we want to be sure we are articulating clearly and enunciating our words fully to best help our audience understand and hear our message.
It can be helpful to add notes about paralanguage on your delivery outline, such as “slow down here,” or “be sure to really accent these words,” etc.
Eye, Facial, and Body Communication
When it comes to eye communication, you definitely want to make eye contact with your audience (without staring at any one person too long). This includes your instructor; sometimes students begin delivering their speech to the instructor, which is a natural thing to do, but you want to make sure you’re making eye contact with your entire audience. This obviously means you don’t want to be reading from your notes too much, and you don’t want to have your back turned to the audience and be reading or speaking to your PowerPoint slides. As with paralanguage, variety is important: you want to look around the room, making eye contact with your audience, and occasionally looking at your notes and/or your PowerPoint as appropriate.
Similarly, with facial communication, you will want some variety, and you will want to try to avoid a negative expression or a scowl. If you are passionate about your topic and prepared, your facial expressions will most likely just be natural and reflect that passion. However, it can be helpful to add some notes to your delivery outline if this is something you struggle with.
Finally, consider what you will do with your body when you deliver the speech. Moving around while delivering the speech can feel much more challenging than making eye contact, and, fortunately, unless it is an integral part of your speech, it is often unnecessary. When it comes to your body movement and body communication, the two most important things are to have good posture and to avoid hiding behind something. When it comes to posture, sometimes students try to make themselves “smaller” by slumping, which doesn’t work well for projecting confidence. In addition, it makes it harder to breathe well and speak well. Regarding hiding, sometimes students are tempted to stand behind the lectern/computer station, which is something you want to avoid. Stand where your audience can see you fully so you can communicate most effectively.
Using your Delivery Outline
Finally, when it comes to using your delivery outline, you want to be subtle (this is really a part of eye contact, as discussed earlier). You aren’t reading your speech – never use your preparation outline for your delivery outline – so you shouldn’t be staring at your delivery outline. Know your speech well, be rehearsed, and use your delivery outline to prompt you or remind you of specific quotes and things regarding the delivery of the speech itself. As with all parts of delivery, the goal is to have the use of notes feel natural.
Sometimes students focus on the delivery outline/note cards because doing so is more comfortable than looking at the audience, but this is not a good strategy. Communicate with your audience by looking at them, rather than your notes.
When it comes to delivery and rehearsal, the key thing is that you are rehearsing the actual delivery of the speech, not trying to memorize it. There is a big difference between having a speech memorized and having practiced the delivery of the speech, and students often find giving a speech is much more stressful if they have only tried to memorize it, rather than focusing on rehearsing the actual delivery.
Conclusion
The organization and outlining of your speech may not be the most interesting part to think about, but without it, great ideas will seem jumbled and confusing to your audience. Even more, good connectives will ensure your audience can follow you and understand the logical connections you are making with your main ideas, introduction, and conclusion.
References
1.Beighley, K. (1954). An experimental study of the effect of three speech variables on listener comprehension. Speech Monographs, 21(4), 248-253.
2. Bodiea, G. D., Powers, W. G., & Fitch-Hauser, M. (2006). Chunking, priming and active learning: Toward an innovative and blended approach to teaching communication-related skills. Interactive Learning Environments, 14(2), 119-135.
3. Daniels, T. D. & Whitman, R. F. (1981). The effects of message introduction, message structure, and verbal organizing ability upon learning of message information. Human Communication Research, 7(2), 147-160.
4. Slagell, A. (2013). Why should you use a clear pattern of organization? Because it works. Communication Teacher, 27(4), 198-201.
5. Sharp Jr., H. & McClung, T. (1966). Effects of organization on the speaker’s ethos. Speech Monographs, 33(2), 182-183.
6. Yun, K. A., Costantini, C., & Billingsley, S. (2012). The effect of taking a public speaking class on one’s writing abilities. Communication Research Reports, 29(4), 285-291. doi:10.1080/08824096.2012.72327
Chapter Attribution:
the overall goal of a presentation, usually limited to three categories: to inform, to persuade, or to entertain
builds on your general purpose (such as to inform) and makes it more specific (as the name suggests)
purposefully grouping information into an order the audience can logically follow
Common ways to organize a speech logically, these include chronological, spatial, topical, cause-effect, and problem-solution formats.
An organizational patter that groups information based on time order or in a set chronology—first this occurred, then this, then this, then that
A common organizational pattern which moves thorough the thought process based one movement in space or direction
A common organizational pattern that groups information logically into naturally divides such as “types of,” “kinds of,” “sorts of,” or “categories of.”
A common organizational pattern which groups main points of a topic start with the cause(s), followed by the effect(s)
A common organizational pattern asking the audience to address a problem with a concrete course of action
a visual structure where you can compile information into a well-organized document
A written comprehensive outline that include all of the information in your speech. These are often full-sentences and include in-text citations and a reference page
a keyword outline used to deliver a speech – often extemporaneous
statements generally designed to help “connect” parts of your speech to make it easier for audience members to follow.
Connective statements which emphasize what has come before and remind the audience of what has been covered.
Connective statements that let your audience know what is coming up next in the speech and what to expect with regard to the content of your speech.
Connective statements that bridge between seemingly disconnected (but related) material, most commonly between your main points.
connective statements that emphasize the physical movement through the speech content and let the audience know exactly where they are. Signposting can be as simple as “First,” “Next,” “Lastly” or using numbers such as “First,” “Second,” Third,” and “Fourth.”
a brief account or story of an interesting or humorous event.
a story about yourself that is relevant to your topic
a question to which no actual reply is expected.
Demonstrating care, concern, and interest in a partner. In a speech it is the relationship or connection you make with your audience.
a succinct, single-sentence, description of the main idea for the presentation. Thesis are often based on and very similar to the specific purpose for the presentation.
clear and easy to follow statement of main points so that there is no question in your audience’s minds what they are.
something memorable with which to conclude your speech
a form of supporting materials, visual and/or auditory examples and tools used to help your intended audience better understand and remember the key ideas in your speech.
A guide for text on visual aids. Generally present no more than six bullet points with no more than six words per bullet point on a slide. Only break this rule if you have a compelling reason.
Voice characteristics and nonverbal vocalizations that communicate feelings, intentions, and meanings. In a speech, paralanguage involves things like inflection, stresses, volume, rate, pauses, rhythm, and creating variety.
Efforts to vary the stress, tone, rate, etc. of a speech to avoid sounding monotonous and repetitious.
